Install and Create Instance
Set up a server
Jethro runs on a Linux server. Typical deployment requires a RedHat/CentOS server with 128 GB of RAM, 16 CPU cores and 500GB of disk space.
Jethro stores its data on Hadoop, but can use any file system, either local or network, instead.
See the installation guide for server requirements and setup:
http://jethro.io/learn/documentation
If using Amazon AWS, you can view the following post on how to install Jethro on an EC2 instance:
http://jethro.io/blog/how-to-set-up-an-amazon-instance
You can also view this video that shows how to install Jethro on AWS:
https://www.youtube.com/watch?v=jdREOTFmcdk&t=691s
Download the software
Go to http://jethro.io/download1 to download the software.
Install Jethro
Download the installation rpm to the Jethro server and run the following command as root, to install it:
rpm -Uvh <rpm file>
See the installation guide for Jethro install:
http://jethro.io/learn/documentation
Create an Instance
Before creating an instance you need to create a directory for the storage and for local cache and to change the ownership of these directories to user “jethro” which was created as part of the installation process.
Then, login as user “jethro” (password is also “jethro”) and run the command:
JethroAdmin create-instance <instance name> -storage-path=<storage path> -cache-path=<local cache path> -cache-size=300G
Replace <instance name> with the name you want to give the instance, <storage path> with the full path of the storage directory on Hadoop and <local cache path> with the full path of the local cache directory. Set the cache size according to the size on the local cache directory.
This video shows how to connect Jethro to Hadoop:
https://www.youtube.com/watch?v=4zOEpdiBQjA
For instances with storage NOT on Hadoop, add the following parameter to the end of the command:
-Dstorage.type=posix
Notes:
- When using MapR as your hadoop distribution, it is recommended to mount the MapR cluster using MapR NFS and use it as a posix file system. This video shows how to setup Jethro with mapR: https://www.youtube.com/watch?v=652C6myrlOQ&t=88s
- When using local disk for storage, there is no need for local cache. In this case, set the local cache size to 0G. The following video shows how to create and instance on a local file system: https://www.youtube.com/watch?v=jdREOTFmcdk&t=57s
After creating the instance, you can start the Jethro service by running:
service Jethro start
Analyze data
Analyzing the data will help you to determine the correct data type for each column and also will create the table creation script and description files that are needed to load data.
Download the Data Analysis tool
Download the tool using this link:
https://github.com/JethroData/AnalyzeData/archive/master.zip
Unzip the file and then go to the AnalyzeData-master directory.
Analyze sample data
Use the AnalyzeData script to analyze the data.
It requires python to be installed on the server.
It also uses an optional python package called “tabulate” to generate the data analysis report. To install tabulate, use the command:
TABULATE_INSTALL=lib-only pip install tabulate
If pip is not installed, install it using the command:
wget https://bootstrap.pypa.io/get-pip.py

python get-pip.py
Note: Installing tabulate requires root or sudo access to the server. If you do not have root or sudo access, you can still use AnalyzeData. In this case, it will fall back to csv mode when displaying the results.

Run Analyze data with the following optional parameters:
AnalyzeData.py [-i <rows to read>] [-d <delimiter>] [-q <quote char>] [-n] [-c] [-g <table name>] [<input file>]
-i: Number of rows to read from the input. Default=unlimited.
-d: The input data delimiter. Default="," (comma).
-q: The input data quote character. This allows a delimiter character inside quotes as part of the data. Default=" (double quotes).
-n: If specified, treats the first row as headers row which contains the column names.
-c: CSV formatted output. Write the output report as a tab delimited file instead of a formatted table. Installing tabulate is not required in this mode.
-g: Generate a create table script and a description file using the given table name.
input file: The input file to read. If not specified, read from standard input.
It is recommended to limit the input up to 1 million rows (-i 1000000).
This will generate a report such as the following:
Number: The column serial number.
Name: The column name, if the data contains headers. Otherwise it is c1..cN.
Rows: The number of rows for the column.
Type: The suggested type to use based on the data. A non string type is suggested in case non string values are found and there are no more than 5 distinct exception values.
Category: For certain values, a category can be detected based on regular expressions. It also specifies "Primary Key" when a column has unique values and "High Cardinality" if it has many unique values.
Percent: The percentage of the values of the suggested type out of all values.
Exceptions: A list of up to 5 exception values. Exception values are values that do not match the suggested type.
Distinct: The number of distinct values.
Samples: Sample values of the suggested type.
In addition, if the -g parameter is specified with a table name, then a create table script and a description file is generated based on the data. For the above data, the following scripts are generated as test.ddl and test.desc when given the table name "test":
create table test(
name STRING,
age BIGINT,
birth date TIMESTAMP,
balance DOUBLE,
phone STRING
);
table test
row format delimited
fields terminated by '|'
null defined as 'NULL'
OPTIONS
SKIP 1
(
name,
age,
birth date format='yyyy-M-d',
balance null defined as '-',
phone
)
You can view the report to determine the following:
- Is the suggested type acceptable?
- Is there more than on exception values? Jethro only supports one NULL value for each column, so if there are more than one exception value you either need to modify the values before loading or load this column as string.
- How many distinct values are there. For a string column with many distinct values, you may choose not to load it or to truncate the values so they become less unique (in the case of URL’s for example).
Then, you can modify the table create script and description files if necessary:
- Assign column names if they were not provided as part of the input.
- Change types as required.
- Add a partition definition.
For example, to partition the above table by birth_date every month, add the following just before the create table ending semicolon:
Partition by range(birth_date) every (interval, ‘1’, month)
- Change description file options, like rows or columns to skip.
- To learn more about partitions and description file, consult the reference guide:
https://jethrodownload.s3.amazonaws.com/JethroReferenceGuide.pdf
Load data
Once the data is analyzed and the scripts are created, you can start loading your data.
Create tables
Before loading data, you need to create tables in Jethro.
Start the JethroClient using the command:
JethroClient <instance name> localhost:9111 -p jethro
Copy the create table command and drop it at the command prompt.
Alternatively, you can run the JethroClient with the -i option specifying the ddl file of the table. For example:
JethroClient <instance name> localhost:9111 -p Jethro -i test.ddl
Load data to tables
Once the tables are created, you can start loading data.
To load data to a table use the command:
JethroLoader <instance name> <description file> <input files or directories>
If the data is not in text format, you may need to make it accessible to Jethro first. In this case, you can use a pipe to forward the data to the Jethro loader, specifying “stdin” instead of files or directories. For example, to load data from a hive table, you could run:
hive -S -e “select * from <db>.<table> | JethroLoader <instance name> <description file> stdin
The load process may take some time, so it is recommended to run it in the background by specifying “&” at the end of the command.
When the loader starts running, it will print the path to the log file. You can view this file using tail -f to monitor the load progress.
You can learn more about loading data from the reference guide and from the following video:
https://www.youtube.com/watch?v=Dol7TyTbgVU&t=27s
Connect BI tool and run queries
Once data is loaded, you can connect your BI tool and start working with the data.
Download connection drivers
Connection to Jethro is made through ODBC or JDBC. You first need to download the Jethro drivers from here:
http://jethro.io/driver-downloads
Install the ODBC driver
After downloading the installation file, double click on it to start the install process.
If Tableau is installed on your box, the installer automatically detects that and will ask you to copy the Jethro.tdc file to the proper location.
Create a connection
After installing the ODBC driver, you need to create a connection to Jethro.
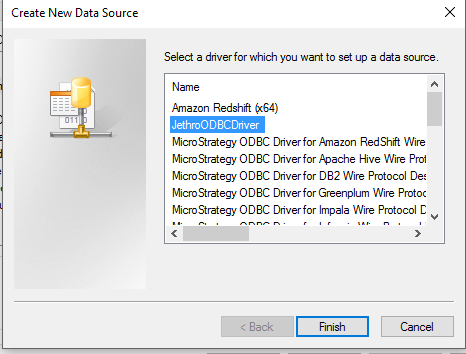
Open the “ODBC Data sources” and go to the “System DSN” tab

Click on the ‘Add” button, select “JethroODBCDriver” from the list of drivers and click “Finish”.
Fill in the details. Choose a data source name. In the host filed, specify all the Jethro servers connected to the instance in the format: <host>:<port>;<host>:<port>….<host>:<port>. This will allow the ODBC driver to load balance between all the servers by sending each query to a different server. You can leave the port filed empty. In the Instance field, specify the Jethro instance name. The Login ID is “jethro” and the password is also “jethro” if you did not change it.
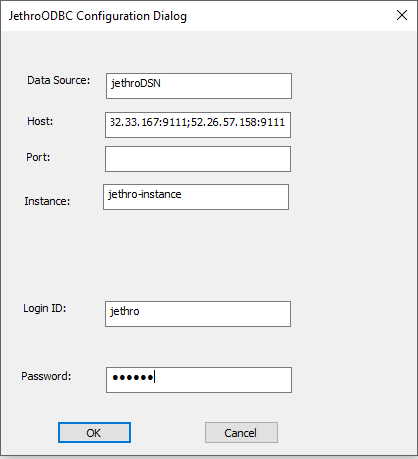
Click OK to save the connection.
Install the JDBC driver
After downloading the JDBC zip file, uncompress it and put its content in a folder of your choice.
The zip file contains 2 jar files: JethroDataJDBC.jar and protobuf-java-2.4.1.jar.
It is important to use both when defining the driver for your tool.
For example, to configure SQL Workbench to connect to Jethro, first add the JDBC driver:
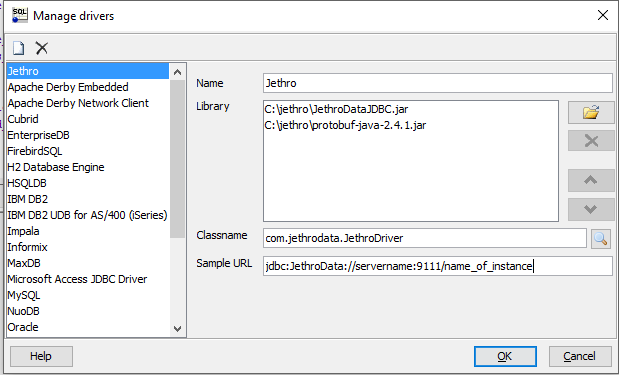
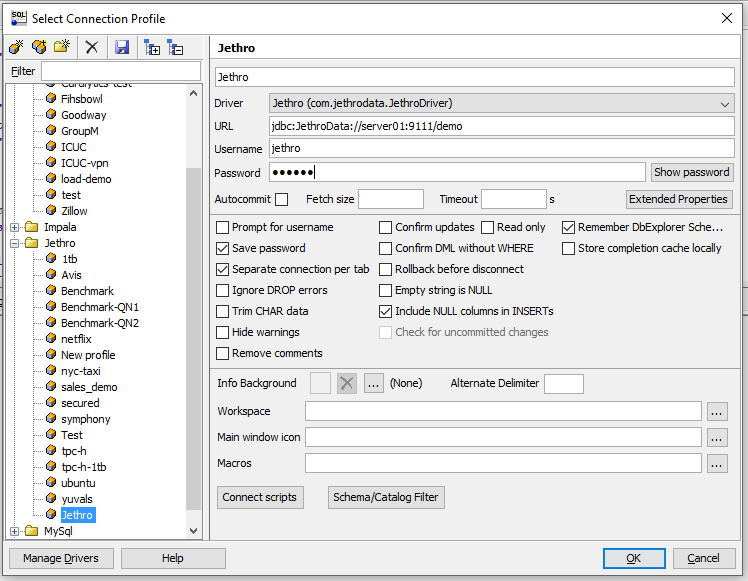
Then, create a new connection providing the connection details:
Connect BI tool
Once a connection is created, you can use it in order to connect your BI tool.
The following video shows how to connect Tableau to Jethro:
https://www.youtube.com/watch?v=secprIbz4tY&t=250s
Setup Automatic Microcubes Generation
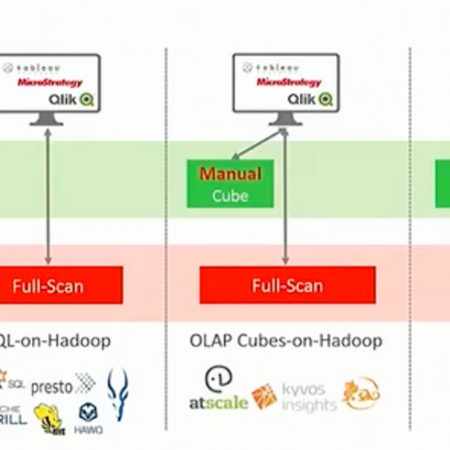
Microcubes provide interactive speed data access for queries with a low number of filters by generating and caching the results for all value combinations of a given query pattern.
Microcubes can be generated automatically from the queries sent by users. It is recommended to set up a separate jethro server that will be dedicated for cube generation. A typical environment should include at least 2 jethro servers. One server will run the maint process and will be used to generate the microcubes. This server can also be used to load data. Any other server will be used to query data.
We assume that the existing server will be used for microcubes generation and any new server will be used for queries.
Setup query servers.
- Set up the new jethro servers.
- In each server, attach the server to the instance by running the command:
JethroAdmin attach-instance <instance name> -storage-path=<storage path> -cache-path=<local cache path> -cache-size=300G
Replace <instance name> with the name of the instance, <storage path> with the full path of the storage directory on Hadoop and <local cache path> with the full path of the local cache directory. Set the cache size according to the size on the local cache directory.
For instances with storage NOT on Hadoop, add the following parameter to the end of the command:
-Dstorage.type=posix
- Start the jethro service on each server:
service jethro start
- Edit any ODBC/JDBC connection to include the list of query servers that you set.
Configure autocube generation
- In the first server that you set, where you created the instance, edit the file:
/opt/jethro/intances/<instance name>/local-conf.ini
- At the end of the file, add the following 3 lines:
dynamic.aggregation.auto.generate.enable=1dynamic.aggregation.auto.update.incremental.cubes.enable=1
dynamic.aggregation.auto.generate.execution.hosts=localhost:9111
- Save the file.
- Restart the jethro service:
service jethro restart
Now, microcubes will be generated automatically based on the queries that are being sent by users.
Generate microcubes manually
If you do not want to allocate a server for microcubes generation, you can still generate microcubes manually for specific queries.
Connect to the server using JethroClient or any other SQL client and run the command:
generate cubes <cube name> from <sql query>
You should replace <cube name> with a cube name of your choice.
This command will instruct the server to try to generate microcubes for the given sql query. If microcubes can be generated for the query, they will be generated and you will get a response. Otherwise, you will see a response with the reason why the microcube was not generated.
To see the existing microcubes, run the following sql command:
show cubes